
In many kitchens, the extractor hood works faithfully above the hob, drawing in steam, grease particles and odours – while becoming a magnet for grime itself. Put off cleaning for too long and you can eventually be faced with a greasy, encrusted surface. It sounds like a job that will take hours of scrubbing. Yet a simple, little-known method can make an extractor hood shine again in a short time – without any specialist cleaner advertised on television.
Why the extractor hood quickly becomes a trap for dirt
When food is cooked, grease and moisture rise with the steam. The hood captures this mixture and either vents it outside or, through a grease filter and possibly an activated-carbon filter, returns the air to the room. Although this sounds effective, there is one drawback: grease particles stick to virtually everything.
- the metal or glass housing
- the filters
- control buttons or touch panels
- the greasy film on nearby wall cupboards
Over time, this creates a stubborn layer of grease and dust. It is not merely unsightly; it also reduces the hood’s effectiveness.
A dirty extractor hood filters far less effectively, often uses more energy and leaves the air stuffy while cooking.
Anyone who regularly fries food, enjoys deep-fried dishes or often cooks without a lid will intensify the problem. The kitchen air then feels heavier, curtains and fabrics absorb odours more readily, and greasy dust settles more quickly on furniture. This is precisely where the straightforward cleaning trick comes in, making the hood look almost new again.
The “magic” basic trick: loosening grease with two household staples
The underlying principle is uncomplicated: grease is best dissolved with warm water, surfactants and a mild acid. There is no need for harsh chemical products from the cleaning aisle.
Step 1: prepare the right mixture
Take a bowl or bucket and fill it with very warm, but not boiling, water. Then add the key ingredients:
- 2–3 squirts of standard washing-up liquid
- a generous splash of household vinegar (clear vinegar, or vinegar essence heavily diluted)
Washing-up liquid contains surfactants that encapsulate and lift grease from the surface. Vinegar removes limescale residue, reduces mild odours and can restore shine to stainless steel in particular.
The combination of warm water, washing-up liquid and vinegar is surprisingly powerful against grease – and in many cases replaces expensive specialist cleaners.
Step 2: prepare the surfaces and allow the grease time to soften
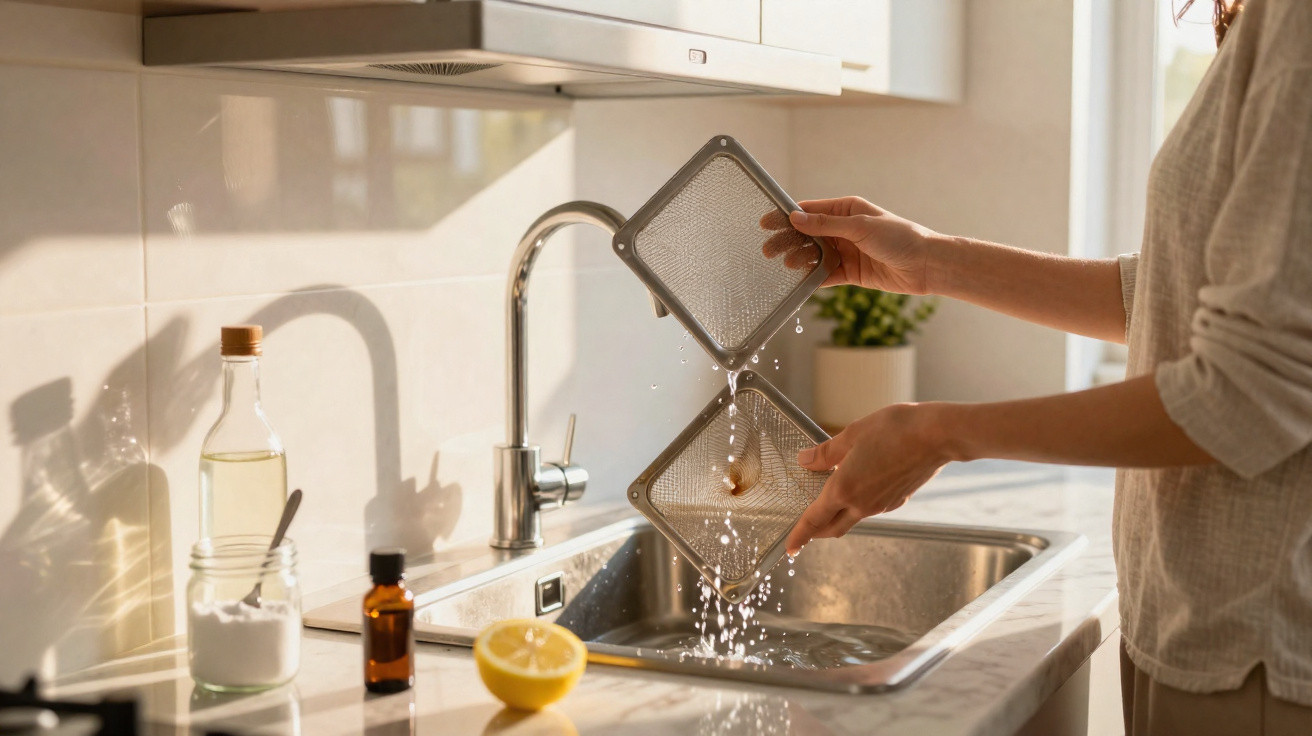
Switch off the hood and, where possible, unplug it. Start by taking out the metal filters, which can usually be released using a click or sliding mechanism.
Then turn to the exterior surfaces:
- Soak a soft sponge or microfibre cloth generously in the cleaning solution.
- Apply the solution liberally over the hood rather than wiping it away immediately.
- Leave it to work for 5–10 minutes, especially around the edges and beneath the hood.
This is the small but important difference: many people dry the surface again too soon. Grease comes away much more easily when the surfactants are given time to work.
Step 3: give the filters a professional-style soak
Metal filters are often the most challenging part – sticky, yellowish and sometimes even dripping. Use the same mixture here, but more intensively:
- Fill a sink or large washing-up bowl with hot water.
- Add a generous amount of washing-up liquid, then stir in some vinegar.
- Fully submerge the filters and leave them to soak for 15–30 minutes.
- Brush them afterwards with a soft brush, such as a vegetable or washing-up brush.
- Rinse with clean water and allow them to dry thoroughly.
Many people are surprised by the amount of brown liquid that gathers in the sink after a short while – a clear indication of what would otherwise remain stuck inside the hood.
| Step | Purpose | Duration |
|---|---|---|
| Soaking the filters | Loosen grease and flush it from crevices | 15–30 minutes |
| Coating exterior surfaces | Soften the film of grease and dust | 5–10 minutes soaking time |
| Brushing or wiping afterwards | Remove residue and smooth the surface | approx. 10 minutes |
Finishing touches: making the extractor hood shine like new
Once the grease has soaked and the bulk of it has been removed, it is time to focus on appearance. Stainless steel in particular quickly develops streaks if it is dried too hurriedly.
- Use a clean, well-wrung cloth to remove all remaining solution.
- Polish afterwards with a second, dry microfibre cloth.
- On stainless steel, always wipe in the direction of the grain rather than across it.
If desired, put a few drops of neutral vegetable oil, such as sunflower oil, onto a cloth and spread an extremely thin layer over the metal surface. This not only adds shine but also makes fresh dirt slightly less likely to adhere. Too much oil will leave a greasy finish, so only a minimal quantity is needed.
A thin protective film on stainless steel can make grease easier to wipe away next time – without damaging the surface.
Neutralising odours: what the extractor hood can – and cannot – do
An extractor hood removes steam, grease and some cooking odours from the air. However, for particularly strong-smelling foods, it is often not enough by itself. Two simple aids work well alongside a freshly cleaned hood.
Bicarbonate soda on the worktop
Bicarbonate soda, often sold as baking soda or bicarbonate, binds odours remarkably effectively. After cooking, sprinkle a small amount onto a still slightly warm worktop – for example, where onions were chopped or fish was prepared – leave it briefly, then lift it away with a damp cloth.
The powder acts like an odour sponge. Unlike room sprays, it does not simply mask smells; it chemically neutralises many of them.
Essential oils in the right places
Those who enjoy a pleasant background scent in the kitchen can use essential oils as an extra measure. A few drops on a cotton pad placed near the bin or food-waste caddy can noticeably reduce the typical smell of rubbish.
- Lemon smells fresh and has a mildly disinfecting effect.
- Lavender adds a gentle floral note.
- Eucalyptus is stronger and clearer – use it sparingly.
Important: never apply oils directly inside the hood or onto the filters. They may damage the materials and become unpleasant in the airflow.
How often should you clean it? A realistic routine for everyday and family kitchens
There is no single ideal cleaning schedule, as it depends heavily on how you cook. These broad guidelines offer a useful starting point:
- Occasional cooks (1–2 hot meals per week): clean every 2–3 months
- Typical household (cooking almost every day): clean every 4–6 weeks
- Frequent frying or a family kitchen: clean every 2–4 weeks
Regularly wiping the underside of the hood with a damp cloth shortly after cooking can greatly extend these intervals. The “magic” intensive method using washing-up liquid and vinegar then becomes a quick refresh rather than a major cleaning task.
Risks and limits: when simple household remedies are no longer enough
As effective as the washing-up liquid and vinegar mixture is, it has limitations. Some situations require closer attention.
- Filters that are warped or torn should be replaced.
- Activated-carbon filters in recirculating hoods generally cannot be washed and must instead be changed at specified intervals.
- Encrusted buttons or faulty switches can indicate that grease has entered the appliance – it is better to have this checked by a professional.
Vinegar is unsuitable for aluminium because it can tarnish the metal. If in doubt, test the solution on an inconspicuous area first, or use only warm water and washing-up liquid on such surfaces.
Practical example: how a “hopeless” extractor hood can look presentable again in one evening
Imagine a rented flat where nobody has thoroughly cleaned the extractor hood for years. Its underside is dark yellow, the filter feels like cardboard and the airflow is weak.
Using the method described above, a typical cleaning evening would proceed as follows:
- Remove the filters and soak them in a hot washing-up liquid and vinegar bath.
- Meanwhile, coat the hood’s exterior and underside generously with the solution.
- Once the soaking time has passed, use a brush and cloth to work over the surfaces and remove marks.
- Brush the filters, rinse them well and leave them to dry.
- Refit all parts and run the hood briefly as a test.
The most time-consuming part is waiting while everything soaks. The actual effort involved remains surprisingly small. By the end, the hood not only looks better cared for, but also runs noticeably more quietly and extracts more effectively.
Why the effort pays off mentally and practically
A clean extractor hood may seem insignificant – until you are in a kitchen without one, or with one that is completely overloaded. Odours linger longer, walls turn yellow more quickly and cooking becomes less enjoyable.
Making the simple washing-up liquid and vinegar trick part of a regular cleaning routine brings several benefits: the air stays fresher, cooking feels more pleasant and the hood’s lifespan is extended. It also lowers the risk of grease catching fire inside the hood – something many people only take seriously when it is already too late.
There is also an effect that is often underestimated: a clean, gleaming extractor hood gives the entire kitchen a well-kept appearance. In everyday life, that can quietly make cooking more appealing – rather than prompting an automatic reach for the food-delivery app.


Comments
No comments yet. Be the first to comment!
Leave a Comment