
The answer may, surprisingly, already be sitting in your kitchen cupboard.
In households throughout the UK, the US and elsewhere, black mould stains on bathroom sealant are an all-too-common nuisance. Regular cleaning, pungent sprays and aching shoulders can appear to achieve very little. However, cleaning specialists say one everyday baking ingredient can remove these marks quickly, without expensive products or professional help.
Why bathroom joints attract mould
Even a bathroom that appears spotless can offer perfect mould-growing conditions. Heat, moisture and inadequate ventilation provide microscopic fungi with what they need to flourish.
Sealant around showers, baths and basins is especially exposed. Water collects in its narrow channels, while soap residue and shampoo deposits provide a food source. Eventually, black or brown lines can develop on silicone or grout.
Mould on bathroom joints is not just a cosmetic problem. Spores can affect air quality and irritate sensitive airways.
Health bodies consistently associate repeated mould exposure with respiratory irritation, particularly for those with asthma, allergies or weakened immune systems. Children and older people may be particularly susceptible.
For that reason, seemingly insignificant black marks on sealant need more attention than a hurried wipe with a sponge.
Why ordinary cleaning products can fall short
Bleach sprays and strongly scented detergents are often the first products people use. Although they may initially make stains seem paler, dark marks frequently reappear within a few weeks.
This recurring issue has three key causes:
- Bleach often brightens the outer surface, but may not reach mould embedded deeper in porous grout.
- Strong chemical cleaners may gradually damage sealant, producing tiny cracks that give mould more places to settle.
- Poor ventilation is left unaddressed, allowing humid conditions to continue encouraging fresh growth.
Cleaning experts are increasingly advising the use of gentler, more focused products that physically lift mould instead of simply concealing it.
The cupboard ingredient that makes a difference
More home-care specialists are recommending an inexpensive, well-known product: bicarbonate of soda, also known as baking soda. It is useful for far more than baking and deodorising fridges; it can also be an effective bathroom-cleaning aid.
Its usefulness comes from several qualities:
- Its mild abrasive action helps remove grime and biofilm without scratching tiles or most sealants.
- Its antifungal properties interfere with mould growth.
- It neutralises odours that cling to damp joints.
- It breaks down into harmless substances, making it an environmentally friendly option compared with harsh chemical cleaners.
Bicarbonate of soda can clean deeply, tackle odours and protect surfaces, all for a fraction of the cost of specialist sprays.
It is available in the baking aisle of most supermarkets, and a small box will generally cost less than a branded bathroom cleaner.
How to prepare a bicarbonate of soda paste for mould
The approach becoming popular online and with cleaning professionals is intentionally straightforward. Rather than soaking the affected area, the idea is to create a thick paste that clings to the bathroom joints.
Step-by-step recipe
For an average shower enclosure or bath edge, gather:
- About three tablespoons of bicarbonate of soda
- A small amount of cold or lukewarm water
- An old toothbrush or a small scrubbing brush
- A sponge and a clean, dry cloth
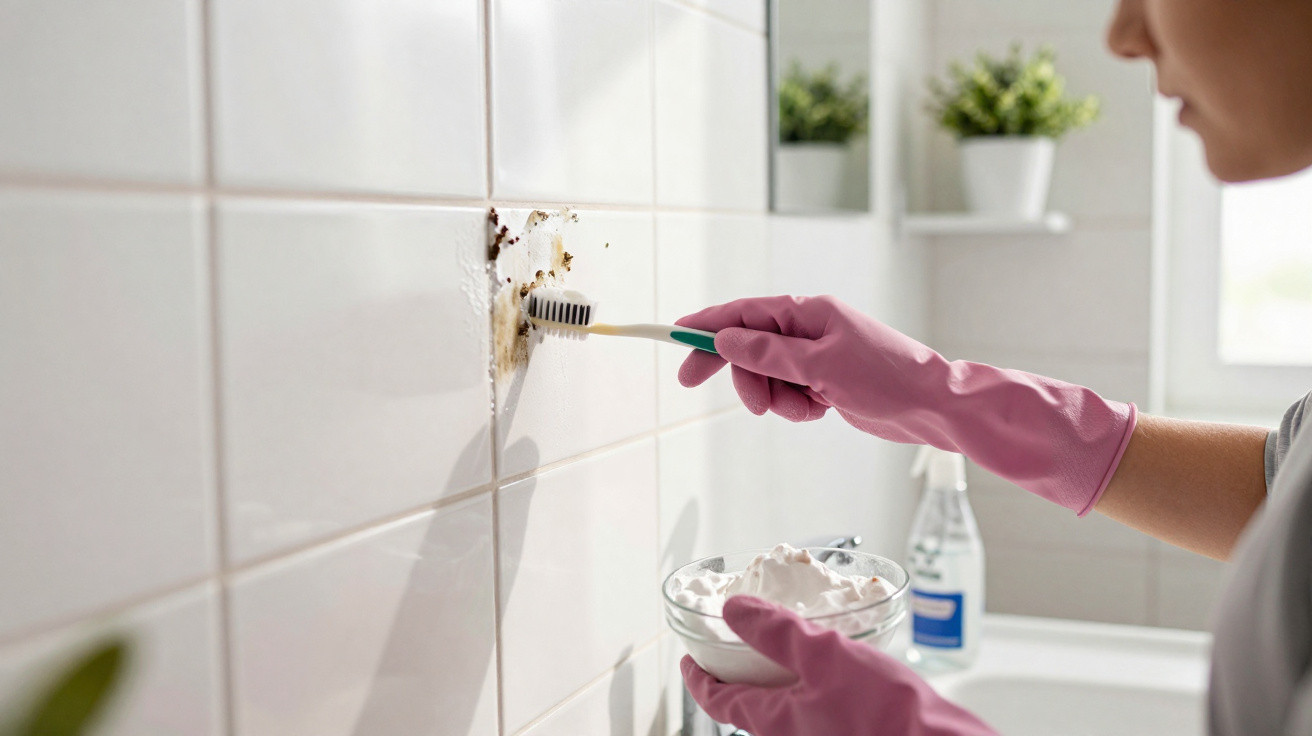
Put the bicarbonate into a small bowl and gradually add water, one teaspoon at a time. Mix until it forms a dense paste that resembles toothpaste rather than runny cake mixture. Should it slide off the spoon, too much water has been added, so mix in a little extra powder.
Applying the paste to bathroom joints
When the paste is prepared, proceed as follows:
- Slightly dampen the mouldy joints to help the paste spread.
- With the toothbrush, press the paste directly over the stained lines, applying a generous coating.
- Allow it to remain for at least 15 to 30 minutes, giving the product time to act.
The waiting time allows bicarbonate to soften stubborn deposits and detach mould from the surface instead of just smearing it.
For heavily affected spots, some professionals advise leaving the paste on for longer, up to an hour, provided it does not become completely hard. If it begins drying out, lightly misting it with water from a spray bottle can reactivate it.
How to scrub and rinse bathroom joints correctly
Once the paste has rested, manual cleaning completes the process. Scrubbing removes the mould loosened by the bicarbonate mixture.
Tackle the area in small sections:
- Use firm, short toothbrush strokes along the joints.
- If the paste is too gritty to work with, add a small splash of water to the brush.
- When the stains begin to disappear, wipe the area with a damp sponge.
- Rinse thoroughly with clean water so that no residue remains.
- Finish by drying the joints with a clean cloth or an old towel.
Drying is an important stage that many people overlook. Allowing surfaces to stay wet merely recreates the environment in which mould first spread.
Preventing mould from returning
A single clean is useful, but consistent prevention habits have the greatest effect. Specialists identify humidity management as the crucial factor.
The less time water spends sitting on your sealant, the less chance microscopic fungi have to settle and grow.
A few straightforward habits can significantly alter the bathroom environment:
- Open a window or use the extractor fan for at least 15 minutes after every shower or bath.
- Wipe water from tiles, glass and joints with a squeegee or old towel.
- Keep the shower curtain or door slightly open to improve air circulation.
Many cleaning advisers also recommend quickly wiping joints with white vinegar each week. Its acidity creates a surface that is less welcoming to mould, especially with regular use. Apply it using a cloth or spray bottle, leave it for a few minutes, then rinse and dry the area.
When a home remedy may not be enough
For most households, a bicarbonate paste combined with improved ventilation produces noticeable results. In some cases, though, the mould issue may be more serious.
| Situation | Probable cause | Recommended action |
|---|---|---|
| Persistent mould under intact sealant | Moisture trapped behind tiles | Check for leaks, consult a plumber or tiler |
| Cracked or peeling silicone | Aging sealant or harsh chemicals | Remove and replace the joint fully |
| Mould in several rooms | High humidity across the property | Assess insulation, ventilation or consider a dehumidifier |
A persistent musty odour, or dark patches expanding across walls and ceilings, suggests a wider damp problem rather than merely unclean joints.
What “mould” on bathroom joints actually means
The black marks commonly described as “mould” are generally colonies of microscopic fungi. Spores remain in household air even when they are invisible, waiting for a damp and mildly warm surface.
Silicone and grout surrounding showers are particularly at risk. Silicone is not itself organic, but grime, soap scum and skin oils create a fine layer across it. Fungi feed on this layer and take hold in minute surface imperfections.
This is why even newly fitted bathrooms can show marks after only a year where ventilation is poor. The issue is less about hygiene than ongoing moisture over time.
Real-life examples of how small changes help
Consider two comparable homes with bathrooms of the same size and similar shower setups. In the first, the extractor fan is not used and the door is closed straight after a hot shower. Droplets remain on the tiles throughout the evening. Within a few months, faint grey lines start to appear on the joints.
In the second, somebody spends 30 seconds after every shower drying the joints with a towel and leaving the fan running. They use a bicarbonate paste once a month on any questionable marks. A year on, the sealant remains closer to its original colour, and there has been no need to purchase specialist mould sprays.
The difference shows that regular, simple actions can transform long-term results more effectively than heavy chemical products.
Benefits, risks and safely combining cleaning methods
Bicarbonate of soda is widely regarded as safe for household cleaning, although some care is still needed. Its abrasive particles can leave marks on very soft materials, including high-gloss plastics, when scrubbed too forcefully. Test it first in a small concealed spot.
Cleaning products must also be combined cautiously. It can be tempting to mix vinegar, bleach and bicarbonate into a supposed super-cleaner, but this is potentially dangerous: combining bleach with acids such as vinegar may release chlorine gas. The safer option is to use only one method at a time and rinse between treatments.
Using gentle products in the right order often beats throwing a cocktail of chemicals at the same patch of mould.
Using bicarbonate and vinegar has financial and environmental advantages. It can help households use fewer plastic bottles and reduce the amount of harsh residue entering the drain. Clean, dry bathroom joints can also improve air quality and make everyday routines more pleasant.
For busy families, the appeal is straightforward: fewer dark marks, fewer harsh fumes and a fresher bathroom using items already at home.



Comments
No comments yet. Be the first to comment!
Leave a Comment